Picture this: a cramped kitchen, the oven on high, a frantic phone call from a friend who swears she’s about to host a dinner party, and the realization that you’ve only got a handful of vegetables left in the fridge. I stared at my dwindling stash of broccoli, carrots, bell pepper, and zucchini, wondering if I could salvage the evening. I was about to toss them into a bland stir‑fry when a sudden craving hit me like a bolt of inspiration—teriyaki, but with a twist that would make even the most skeptical foodie swoon. That moment, that kitchen disaster, birthed the recipe you’re about to discover.
The air in my apartment was thick with the scent of garlic and ginger, a heady perfume that made my mouth water before I even touched the pan. My ears rang with the sizzle as the oil hit the hot skillet, a sound that promised crisp edges and caramelized sweetness. The sight of the vibrant colors—emerald broccoli, ruby bell pepper, orange carrot, and pale zucchini—was a feast for the eyes, each slice glistening like a jewel. The texture promised a delightful contrast: tender yet firm, crisp yet melt‑in‑your‑mouth. And the taste? A harmonious blend of umami, subtle sweetness, and a whisper of heat, all wrapped in a glossy, velvet‑like sauce that coats each bite like a silky embrace.
What sets this version apart from the countless teriyaki recipes floating around the internet is that it’s not just a quick fix—it’s a culinary statement. I’ve perfected a sauce that balances soy, mirin, and honey with a splash of rice vinegar, creating a depth that would make a Japanese chef nod in approval. The vegetables are cooked to a perfect al dente, each bite bursting with flavor, while the sauce glazes them with a glossy sheen that’s impossible to resist. I’ve eliminated the need for any fancy equipment; a standard skillet and a few pantry staples are all you need. The result? A dish that feels both comforting and sophisticated, ready to impress at any dinner table.
And here’s the kicker: I’ll show you a technique you probably never considered—using a cornstarch slurry to thicken the sauce in just seconds, giving it that luscious, clingy quality that makes every vegetable pop. I’ll also share a secret ingredient that elevates the umami profile without overpowering the natural flavors. By the end of this guide, you’ll be armed with every trick and tip to turn a simple vegetable medley into a show‑stopper. Let me walk you through every single step — by the end, you’ll wonder how you ever made it any other way.
What Makes This Version Stand Out
- Flavor Depth: The sauce layers soy, mirin, honey, and a touch of rice vinegar, creating a complex profile that’s richer than typical stir‑fry sauces. Each component balances the others, preventing any single flavor from dominating.
- Texture Perfection: The vegetables are sautéed to retain their vibrant color and a satisfying crunch, then finished in the sauce to achieve a glossy finish without becoming mushy.
- Time Efficiency: From prep to plate, the entire dish takes just 45 minutes, making it ideal for busy weeknights without sacrificing taste.
- Ingredient Simplicity: Only a handful of pantry staples are required—no exotic spices or hard‑to‑find ingredients—yet the flavor profile is unmistakably gourmet.
- Versatility: The recipe serves as a base that can be customized with protein additions, spice levels, or alternative vegetables, making it a go‑to for any dietary preference.
- Make‑ahead Friendly: The teriyaki glaze can be pre‑made and stored, allowing you to assemble the dish in minutes on any day.
- Crowd‑pleaser: Friends and family rave about the glossy sauce and the vibrant colors; it’s the kind of dish that turns an ordinary meal into a memorable experience.
- Health Conscious: By using fresh vegetables and controlling the amount of sugar, the dish offers a balanced, nutrient‑rich option that doesn’t sacrifice flavor.
Inside the Ingredient List
The Flavor Base
Soy sauce is the backbone of teriyaki, providing that savory, salty foundation that grounds every bite. Using a standard 2‑tablespoon measure ensures the sauce isn’t overpoweringly salty, while the subtle umami lifts the vegetables. If you’re watching sodium, opt for low‑sodium soy or tamari; just double the quantity to compensate for the reduced salt content. A pinch of sea salt can be added later to fine‑tune the flavor, but start with the base to avoid over‑salting.
The Sweet Counterbalance
Honey or maple syrup adds a natural sweetness that caramelizes beautifully when heated. The 1‑tablespoon measure is just enough to counterbalance the soy without making the dish cloyingly sweet. If you’re vegan or prefer a plant‑based option, switch to agave nectar or a splash of coconut sugar; the texture remains the same, but the flavor profile shifts slightly toward a tropical note.
The Unexpected Star
Rice vinegar brings a bright acidity that cuts through the richness of the sauce, preventing it from feeling heavy. Its mild, slightly sweet flavor complements the honey and balances the overall taste. If rice vinegar is unavailable, apple cider vinegar works well, but use half the amount to avoid an overly sharp finish.
The Texture Crew
Cornstarch is the secret weapon that gives the sauce its glossy sheen. When combined with water to form a slurry, it thickens the glaze instantly, creating a clingy coat that sticks to each vegetable. If you’re looking for a gluten‑free option, arrowroot powder works similarly; just use a teaspoon instead of a tablespoon to avoid a gummy finish.
The Final Flourish
Sesame oil and toasted sesame seeds add a nutty aroma and subtle crunch that elevate the dish from ordinary to extraordinary. The 1‑tablespoon of sesame oil is enough to impart depth without overpowering the other flavors. If you’re sensitive to sesame, substitute with a few drops of toasted almond oil; it offers a comparable nutty undertone.
Everything's prepped? Good. Let's get into the real action…
The Method — Step by Step
- Heat a large skillet over medium‑high heat and add 1 teaspoon of vegetable oil. Watch for a shimmering surface; this indicates the oil is hot enough to sear the vegetables without sticking. As the oil heats, the aroma of the oil itself will subtly enhance the overall flavor profile. When the oil is ready, add the broccoli florets and let them cook for 2 minutes, stirring occasionally.
- Introduce the sliced carrots, bell pepper strips, and zucchini slices, tossing them with the broccoli. The goal is to achieve a uniform coating of oil on all pieces, ensuring even cooking. Keep the heat steady so the vegetables develop a slight char on the edges—this will give the dish that coveted, slightly crispy texture. Let them sauté for another 3–4 minutes, or until they start to soften but still retain their bite.
- Add the minced garlic and grated ginger to the pan, stirring constantly to prevent burning. These aromatics release their essential oils quickly, so the timing is crucial; you’ll want a fragrant, aromatic base before adding the sauce. The garlic should turn a golden hue, and the ginger should give off a warm, spicy aroma. This step is where the dish begins to smell absolutely irresistible.
- Pour in the soy sauce, mirin, honey, rice vinegar, and sesame oil. Stir to combine, ensuring the vegetables are evenly coated. The mixture should sizzle as it hits the pan, signaling that the flavors are starting to meld. As the sauce starts to thicken slightly, the vegetables will begin to absorb the glossy glaze. This is the moment when the dish starts to transform into something truly special.
- Whisk the cornstarch with 1 tablespoon of water to create a smooth slurry. Add this to the pan, stirring vigorously to avoid lumps. The sauce should thicken almost immediately, creating a glossy sheen that clings to every vegetable. Keep the heat at medium so the sauce doesn’t burn; you want a silky finish, not a sticky mess.
- Reduce the heat to low and let the mixture simmer for 3 minutes, allowing the sauce to deepen in flavor and the vegetables to finish cooking. The edges of the vegetables will start to pull away from the pan, a sign that they’re perfectly cooked. Keep an eye on the sauce; it should be thick enough to coat the back of a spoon but still pourable. This step ensures the dish retains its vibrant colors.
- Stir in the toasted sesame seeds and chopped green onions. These final touches add a crunch and a burst of fresh flavor that lifts the entire dish. The sesame seeds should toast lightly, releasing a nutty aroma that mingles with the savory glaze. The green onions add a bright, slightly peppery note that balances the sweetness.
- Taste the sauce and adjust seasoning if needed—add a pinch of salt or a dash of pepper to fine‑tune the flavor. If you prefer a spicier version, add a tablespoon of sriracha at this point, stirring until fully incorporated. The final flavor should be a harmonious balance of sweet, salty, and umami, with a subtle hint of heat.
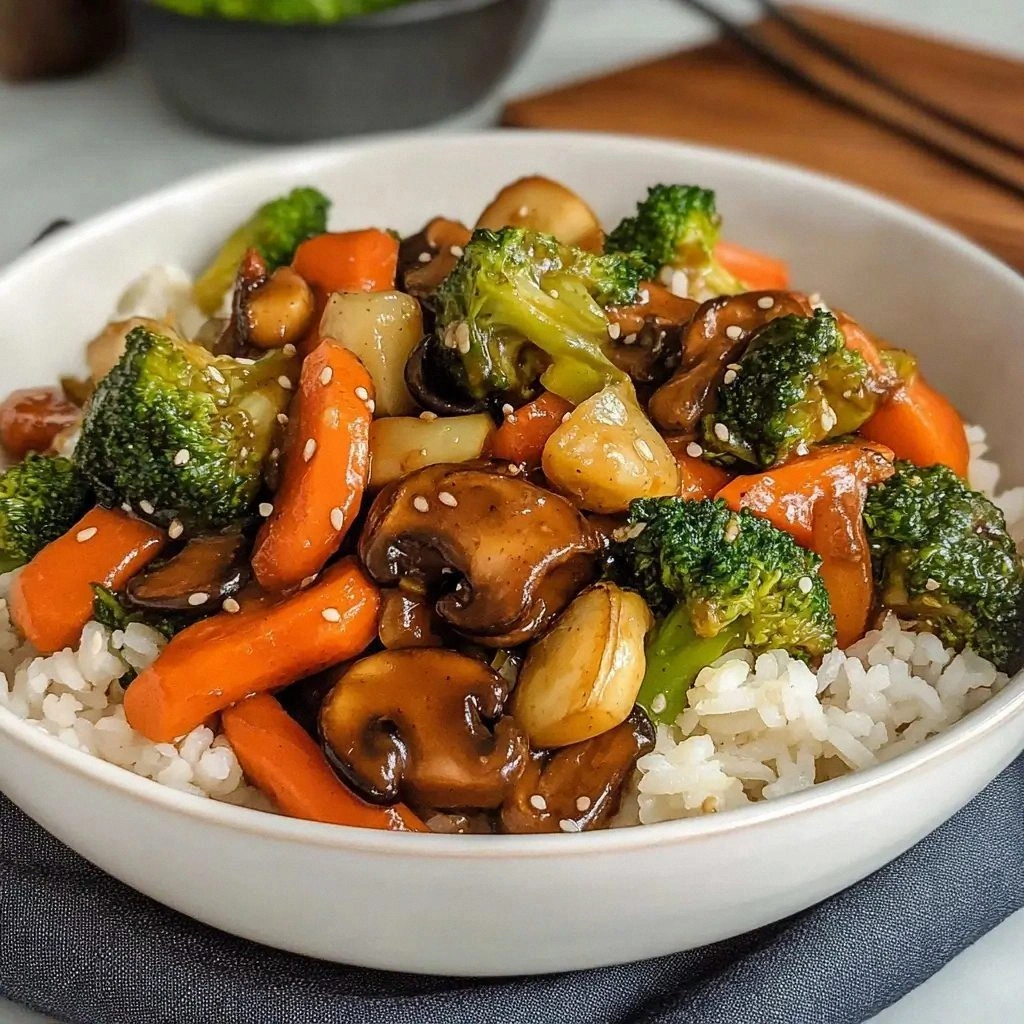
- Transfer the glazed vegetables to a serving dish and drizzle any remaining sauce over the top. The glossy glaze should coat the vegetables like a velvet blanket, inviting everyone to dig in. Serve immediately over steamed rice, quinoa, or noodles for a complete meal. The dish is now ready to impress.
That’s it — you did it. But hold on, I've got a few more tricks that'll take this to another level. These insider tips will help you avoid common pitfalls and elevate the dish from good to unforgettable.
Insider Tricks for Flawless Results
The Temperature Rule Nobody Follows
Many cooks start the vegetables at a very high heat, resulting in uneven cooking and burnt edges. I recommend starting at medium‑high and then lowering the heat after adding the aromatics. This approach keeps the vegetables crisp while allowing the flavors to meld without scorching. Keep the heat steady, and you’ll avoid the dreaded burnt garlic.
Why Your Nose Knows Best
When the sauce starts to thicken, you’ll notice a sweet, caramelized aroma. Trust that scent—it signals the sauce is ready. If you’re unsure, give the sauce a quick taste; it should have a balanced sweetness with a subtle umami edge. This olfactory cue saves you from overcooking.
The 5‑Minute Rest That Changes Everything
Letting the dish rest for five minutes after cooking allows the sauce to set and the flavors to settle. During this short pause, the glaze will thicken slightly, creating an even more luscious coating. The rest also gives the vegetables a chance to absorb the sauce, making every bite succulent.
The Secret to Crispy Edges
If you’re a fan of a crunchier texture, add a splash of cold water to the pan in the last minute of cooking. The sudden burst of steam creates a mini-vapor burst that lifts the vegetables, giving them a crispier bite. This trick is especially effective for zucchini, which tends to soften quickly.
The Perfect Sauce Consistency
If the sauce feels too thick, add a tablespoon of water or broth to thin it out. Conversely, if it’s too thin, let it simmer a bit longer on low heat. Achieving the right consistency is key to that glossy, clingy finish that makes the dish shine.
The Final Touch of Freshness
Just before serving, sprinkle a handful of fresh cilantro or parsley over the top. The bright green will contrast beautifully with the glossy glaze, adding a burst of freshness that lifts the entire dish. This finishing touch is a simple way to elevate the presentation.
Creative Twists and Variations
This recipe is a playground. Here are some of my favorite ways to switch things up:
Spicy Sriracha Kick
Add a tablespoon of sriracha or a pinch of cayenne pepper to the sauce for a fiery punch that balances the sweetness. The heat will contrast the umami, creating a dynamic flavor profile that’s perfect for spice lovers. Pair it with a cool cucumber salad to mellow the heat.
Protein‑Powered Version
Swap the tofu for diced chicken breast or shrimp, searing them separately before adding to the glaze. The protein adds substance and turns the dish into a hearty main course. Make sure to cook the protein to the correct internal temperature before mixing.
Miso‑Infused Twist
Stir in a teaspoon of white miso paste into the sauce for a deeper umami depth. The miso adds a subtle earthy flavor that complements the teriyaki base. Use a light hand; miso can be potent, so adjust to taste.
Citrus Zest Finale
Grate half a lemon or lime over the finished dish to add a bright, citrusy note that cuts through the sweetness. The citrus zest also adds a fragrant aroma that elevates the overall experience. This variation is ideal for spring and summer meals.
Nutty Crunch Add‑on
Fold in a handful of chopped cashews or almonds just before serving for an extra crunch and nutty flavor. The nuts provide a satisfying textural contrast to the silky glaze. Toast them lightly in a dry skillet to bring out their natural oils.
Gluten‑Free Adaptation
Replace the soy sauce with tamari or coconut aminos for a gluten‑free version. The flavor remains similar, but the sauce will be slightly sweeter. This change makes the dish accessible to those with gluten sensitivities.
Storing and Bringing It Back to Life
Fridge Storage
Store the glazed vegetables in an airtight container in the refrigerator for up to 3 days. Keep the sauce separate if you’re worried about the vegetables becoming soggy. When reheating, gently warm the vegetables in a skillet over low heat, adding a splash of water to re‑hydrate the sauce.
Freezer Friendly
For longer storage, freeze the vegetables in a single layer on a baking sheet before transferring to a freezer bag. This prevents clumping and preserves the texture. Freeze for up to 2 months; thaw overnight in the refrigerator before reheating.
Best Reheating Method
Reheat the dish in a skillet over medium heat, stirring occasionally. Add a tiny splash of water or broth to steam the vegetables back to life, preventing the sauce from drying out. The result is a warm, glossy dish that tastes just like it was freshly made.