I was in the middle of a frantic Sunday dinner prep when my kitchen turned into a slapstick comedy set. I had just opened the fridge, the salmon fillets glistening like a secret treasure, and the miso paste looking like it was ready to explode. I had no idea what to do with the extra veggies I’d chopped that morning – carrots, broccoli, bell pepper, zucchini – and I was about to toss them all into a pot of boiling water. The moment the water hissed, I felt a pang of culinary despair, but then my phone buzzed with a message from my friend: “Dude, you gotta try this miso glaze I found. It’s a game changer.” That was the spark that ignited a culinary adventure I’d never forget.
Picture this: a pan heated to a perfect medium‑high, the salmon fillets sizzling as soon as they touch the surface, the aroma of toasted sesame oil mingling with the earthy sweetness of miso. The sound is a satisfying crackle, like a small fire breaking out under a calm sky. The color transforms from raw pink to a glossy, caramelized sheen that looks almost like a lacquered shell. The taste? A burst of umami that coats the flesh like velvet, followed by a subtle sweetness from honey that lingers on the tongue. The texture is a paradox – a tender, flaky interior wrapped in a crisp, caramelized crust that shatters like thin ice when you bite into it.
I’ve tried countless variations of miso‑glazed salmon over the years, but none have matched the harmony of flavors and textures in this version. The secret lies in the balance of miso and soy, the subtle heat of ginger, and the final pop of toasted sesame seeds that add a nutty crunch. Unlike other recipes that over‑season or under‑cook the fish, this recipe ensures the salmon stays moist inside while achieving a caramelized exterior that’s both sweet and savory. The sauce is thick enough to cling to the fillets without becoming syrupy, and the sesame seeds add a satisfying crunch that elevates the dish from ordinary to extraordinary.
If you’ve ever struggled with making salmon that’s both tender and flavorful, you’re not alone. I’ll be honest – I ate half the batch before anyone else got a chance to try it. The result was a culinary triumph that left my friends asking for the recipe. This version is hands down the best you’ll ever make at home, and I dare you to taste it and not go back for seconds. The next sections will walk you through every single step, from ingredient selection to plating, so by the end, you’ll wonder how you ever made it any other way.
Let me walk you through every single step — by the end, you'll wonder how you ever made it any other way. The journey begins with the right ingredients, the perfect balance of sweet, salty, and umami. Then we move to the glazing technique that gives the salmon its signature caramelized crust. Finally, we’ll explore variations, storage tips, and insider tricks that will elevate this dish from simple to spectacular. Stay with me, because this next part? Pure magic.
What Makes This Version Stand Out
- Umami Depth: White miso paste is milder and sweeter than its brown counterpart, creating a balanced flavor profile that lets the salmon shine.
- Crispy Finish: The caramelized glaze locks in moisture while forming a golden crust that cracks delightfully when you bite.
- Time Efficiency: Prep time is under 15 minutes, making it a perfect weeknight dinner without sacrificing flavor.
- Versatile Pairings: The dish works beautifully with steamed rice, sautéed greens, or a simple cucumber salad.
- Ingredient Quality: Using fresh, high‑grade salmon and authentic miso ensures a depth of flavor that’s hard to replicate.
- Make‑Ahead Potential: The glaze can be pre‑made and stored, so you can assemble the dish in minutes on busy days.
Inside the Ingredient List
The Flavor Base
White miso paste is the star of this recipe, providing a mellow sweetness that complements the savory soy sauce. Its subtle flavor allows the delicate taste of salmon to emerge, rather than overpowering it. If you can’t find white miso, a light brown miso will work, but the glaze will taste slightly richer and less sweet. When choosing miso, look for a product with a clear, smooth texture and a mild aroma; this signals a high‑quality paste that will dissolve evenly in the glaze.
Soy sauce adds depth and saltiness, anchoring the glaze’s sweet notes. Opt for a low‑sodium variety if you’re watching your salt intake, but remember to adjust the pinch of salt later in the recipe. A splash of rice vinegar balances the sweetness and adds a bright, acidic note that cuts through the richness of the fish. If you prefer a tangier profile, substitute a teaspoon of lemon juice for the vinegar.
Sesame oil brings a nutty aroma that lingers long after the dish is plated. A small amount is enough to infuse the glaze without overpowering the other flavors. If you’re allergic to sesame, you can replace it with a neutral oil like grapeseed or canola, but you’ll lose the signature aroma. The oil also helps the glaze adhere to the salmon, creating a glossy finish that’s both appetizing and visually striking.
The Texture Crew
Honey or maple syrup adds a natural sweetness that caramelizes beautifully during cooking. It also thickens the glaze, giving it a syrupy consistency that clings to the fish. If you’re vegan, a drizzle of agave nectar or a splash of soy sauce will provide a similar effect. The key is to use a sweetener that doesn’t burn quickly; honey is ideal because it has a lower sugar content and a complex flavor profile.
Garlic and ginger are the aromatic backbone of this dish. Minced garlic releases its sharp, savory essence, while grated ginger adds a subtle heat that balances the sweet glaze. Together, they create a fragrant base that elevates the salmon’s flavor. If you’re sensitive to garlic, reduce the amount or use a milder garlic powder.
The Unexpected Star
Toasted sesame seeds add a delightful crunch and a nutty finish that contrasts with the silky glaze. They also provide a visual pop of color that makes the dish Instagram‑worthy. Toast them in a dry skillet over medium heat until golden brown, stirring frequently to avoid burning. If you’re allergic to sesame, you can substitute crushed pistachios or chopped almonds for a similar crunch.
Sliced scallions bring a fresh, oniony brightness that cuts through the richness of the salmon. They also add a subtle crunch and a pop of green that brightens the plate. For a more pronounced flavor, reserve a few scallion stems for garnish, as they’re less bitter than the leaves. If you’re vegan, you can replace scallions with thinly sliced green onions or even a sprinkle of fresh cilantro.
The Final Flourish
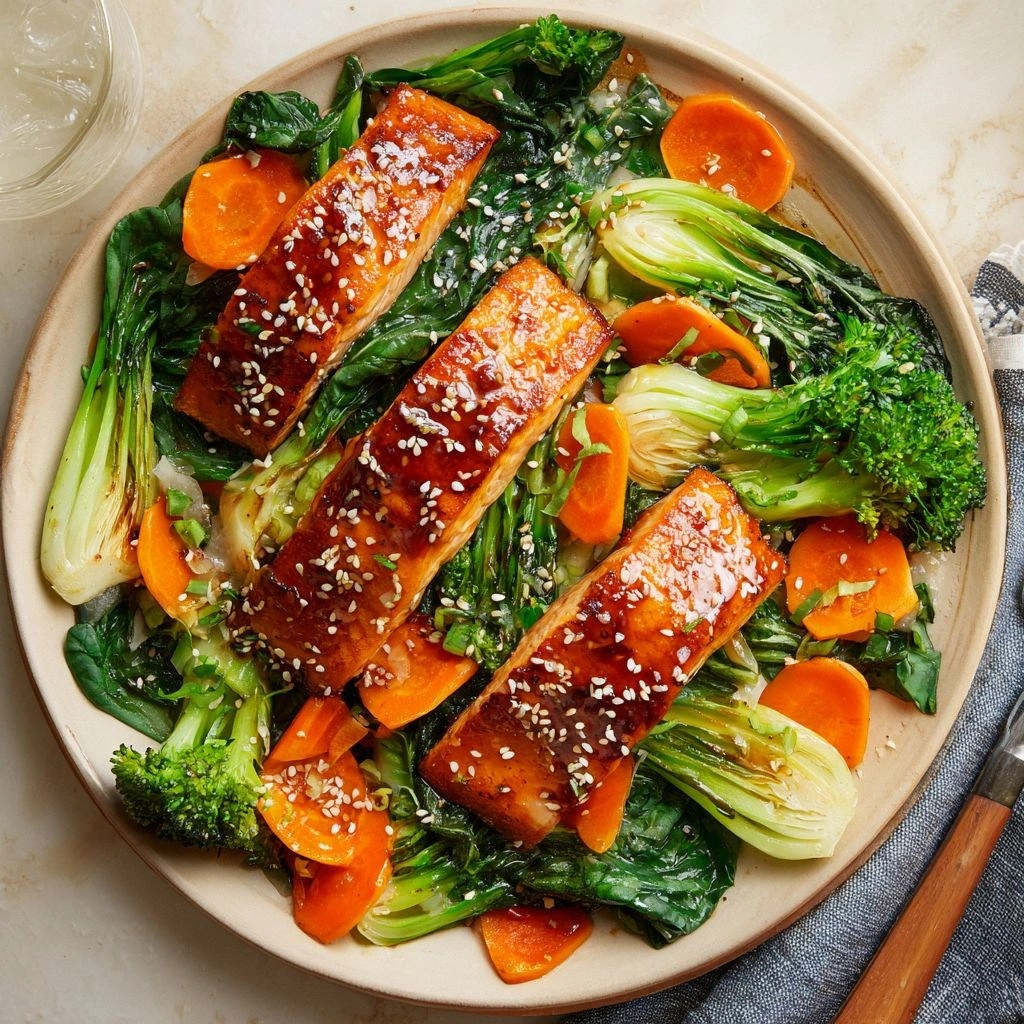
Optional veggies like broccoli, carrots, bell pepper, and zucchini provide a colorful, nutrient‑dense side that balances the richness of the salmon. They also add a variety of textures – crisp, tender, and slightly sweet – that keep each bite interesting. Roast or steam them lightly to retain their bright colors and natural sweetness. If you’re short on time, you can sauté them in the same pan after searing the salmon, using the remaining glaze for extra flavor.
The pinch of salt and pepper to taste are essential for seasoning the salmon. Salt enhances the umami of miso, while pepper adds a subtle heat that elevates the dish. Use freshly ground pepper for a more vibrant flavor, and remember to season the salmon lightly before glazing to prevent it from becoming too salty.
Everything's prepped? Good. Let's get into the real action.
The Method — Step by Step
- Pat the salmon fillets dry with paper towels; this step is crucial for achieving a crisp exterior. Season each fillet lightly with salt and pepper, letting the seasoning sit for a minute to penetrate the flesh. The drier the surface, the better the sear will form. This is the moment of truth – a good sear seals in juices and creates that coveted caramelized crust.
- In a small saucepan, combine the miso paste, soy sauce, sesame oil, honey, and rice vinegar. Warm the mixture over low heat, stirring constantly until the glaze thickens to a syrupy consistency. The glaze should coat the back of a spoon and hold its shape when lifted. Remove from heat and set aside; this glaze will be the heart of the dish.
- Heat a non‑stick skillet over medium‑high heat and add a splash of sesame oil. Once the oil shimmers, lay the salmon fillets skin‑side down (if they have skin). The sizzle you hear is the sound of the fish searing; it should be audible and not a hiss. Let the fillets cook undisturbed for 4–5 minutes, until the edges lift easily from the pan.
- Flip the fillets carefully with a spatula and brush the glaze generously over the flesh. The glaze should coat the surface like a glossy coat of paint. As it cooks, the glaze will caramelize, forming a shiny, slightly crisp layer. This step is where the magic happens – the glaze turns into a caramelized sauce that clings to the fish.
- Reduce the heat to medium and cook the salmon for another 3–4 minutes, or until the internal temperature reaches 125°F (52°C) for medium doneness. The glaze should bubble and thicken, creating a glossy sheen. If you prefer your salmon more well‑done, cook an additional minute or two, but be careful not to overcook.
- While the salmon is cooking, toss the sliced veggies in a small amount of sesame oil, salt, and pepper. Sauté them in the same skillet after the salmon is removed, using the remaining glaze to coat the vegetables. This technique infuses the veggies with the same umami flavor, creating a cohesive dish. The veggies should be tender yet still crisp.
- Remove the salmon from the skillet and let it rest for a minute on a plate. This brief rest allows the juices to redistribute, ensuring the fish stays moist. While resting, sprinkle toasted sesame seeds and sliced scallions over the fillets for an extra burst of flavor and a pop of color.
- Plate the salmon fillets alongside the sautéed veggies, drizzle any remaining glaze over the top, and serve immediately. The contrast of the sweet glaze, the crunchy sesame seeds, and the fresh scallions creates a symphony of flavors that will have your taste buds dancing. The aroma alone will make your kitchen feel like a five‑star restaurant.
That's it — you did it. But hold on, I've got a few more tricks that'll take this to another level. The next section will reveal insider tips that ensure every bite is flawless.
Insider Tricks for Flawless Results
The Temperature Rule Nobody Follows
Many cooks think that high heat is the key to a perfect sear, but the truth is that a medium‑high setting works best for salmon. Too high heat can char the glaze before the fish cooks through, while too low heat will result in a soggy exterior. Use a thermometer to monitor the internal temperature; 125°F is ideal for medium doneness. This small adjustment can transform a good dish into a great one.
Why Your Nose Knows Best
Your sense of smell is the first indicator that the glaze is caramelizing correctly. A sweet, nutty aroma that lingers in the air signals that the sugars are browning just right. If the scent is sharp or metallic, the pan is too hot, and the glaze is burning. Adjust the heat and let the aroma guide you to the perfect finish.
The 5-Minute Rest That Changes Everything
Resting the salmon for five minutes after cooking allows the juices to redistribute throughout the fillet, preventing a dry center. During this brief pause, the glaze also settles into the fish, creating a richer flavor. If you’re in a hurry, even a two‑minute rest is better than none. Trust me, the difference is noticeable.
The Secret to a Crispy Skin
If your salmon fillets have skin, pat the skin dry with a paper towel before seasoning. The drier the skin, the crispier it will become when seared. If you prefer skinless fillets, simply skip this step; the glaze will still provide a beautiful crust. The key is moisture control.
The Quick Broil Finish
After glazing, place the salmon under the broiler for 1–2 minutes to develop a slightly charred crust. Keep a close eye on the fillets; broilers can vary, and you don’t want a burnt glaze. This quick broil adds a smoky depth that pairs wonderfully with the sweet miso base. It’s a small step that makes a big difference.
Creative Twists and Variations
This recipe is a playground. Here are some of my favorite ways to switch things up:
Spicy Sriracha Miso
Add a tablespoon of sriracha to the glaze for a fiery kick that balances the sweetness. The heat will cut through the richness of the salmon, creating a dynamic flavor profile. Serve with cool cucumber slices to mellow the spiciness.
Citrus Ginger Glaze
Replace the honey with orange juice and add a splash of fresh lime zest for a bright, citrusy glaze. The acidity will brighten the dish and pair beautifully with the savory miso. This variation is perfect for a summer dinner.
Smoky Chipotle Miso
Incorporate a teaspoon of chipotle powder into the glaze for a smoky, earthy depth. The chipotle adds a subtle heat that complements the umami of miso. Pair this version with a side of roasted sweet potatoes for a hearty meal.
Herbed Salmon with Basil
Stir in a handful of fresh basil leaves into the glaze for a fragrant, herbaceous twist. The basil’s sweetness will contrast nicely with the salty miso, creating a layered flavor. This variation works well with a light quinoa salad.
Glazed Salmon with Coconut Rice
Serve the salmon over coconut rice for a tropical vibe. The coconut’s subtle sweetness will echo the honey in the glaze, while the rice’s creaminess will balance the fish’s richness. This combo is a crowd‑pleaser at dinner parties.
Vegan Miso Salmon Alternative
Swap the salmon for marinated tofu or tempeh, using the same glaze. The tofu will absorb the flavors beautifully, creating a protein‑rich, plant‑based dish that’s just as indulgent. This version is perfect for a vegan gathering.
Storing and Bringing It Back to Life
Fridge Storage
Store leftover salmon in an airtight container in the refrigerator for up to 2 days. The glaze will keep the fish moist, preventing it from drying out. When reheating, add a splash of water to the pan to create steam, which will help restore the salmon’s juiciness.
Freezer Friendly
For longer storage, wrap each fillet individually in plastic wrap and place them in a freezer bag. Label with the date and freeze for up to 1 month. When ready to eat, thaw overnight in the refrigerator and reheat gently in a skillet with a little water.
Best Reheating Method
Reheat the salmon in a skillet over medium heat, adding a teaspoon of water or broth to keep it moist. Cover the pan for a minute or two to create steam, then remove the lid to allow excess moisture to evaporate. This technique will bring the salmon back to its original tenderness.